Hi, welcome and thanks for visiting my blog! I hope you enjoy looking around, I love to scrapbook and anything crafty and would love to hear what you think so please feel free to leave a comment and don't forget to pop back and visit again real soon x Established 1st September 2009

Pages

Sunday, February 20, 2011

Family ...

Shock horror I did an OTP! Now obviously I'm not in the same league as my my2angels boss, Tracy, the Queen of OTP's, but I like it!!!  
This started its life as a new home card ... but the house came out so well I couldn't bear to give it away!!!!
So I made it into a door hanger!!!
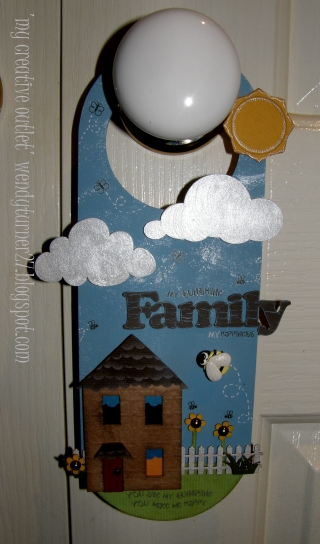
I've used lots of chippy ..... the house, fence, grass and flowers are Scrapware, the clouds are Dusty Attic! 
 I have also used a MLBOW Bee and the 'Family' is a free chippy that I had in my stash!!

Oh and don't forget this is the last day of the My2Angels Sale ... hop on over there and check out the bargains! You only have a few hours left. Also check out the Coming Soon section and the New Arrivals section, I personally can't wait for the new Bakers Twine and Charms to come in .... so cute!!! Oh and of course ALL the new PAPER ranges, Pink Paislee {heart this}, Echo Park, Sassafras Lass, Websters, Graphic 45 and of course a huge range of Prima ..... me? I can't wait for the PP!!

On a personal note ... good luck to a certain someone tomorrow (you know who you are)!
Sending big {{HUGS}} your way xx

TFL .... and for all your wonderful comments! I'll be back again soon, 
(Although I am on slow internet speed for a couple of days ... nasty teenage boys used up all my downloads!!!!)
Wendy x 

Thursday, February 17, 2011

Brothers LO share ... and a Sale!

A quick post to share a LO .... YAY I did a LO!!!
AND to let you know about the

Sale


 over at My2Angels

There is 50% OFF all PATTERNED PAPERS AND 
50% OFF all RIBBONS (excluding organza) from 15th Feb to 20th Feb
and this is in addition to the February monthly sale of 30% OFF all BLING!


My LO uses the gorgeous Cosmo Cricket Circa 1934 papers ...
This main paper is the reverse of  Garbo which is still available at My2Angels  but you'd better hurry on over there to grab it, and whilst you are there check out the rest of the SALE!

As well as a large sheet of the Garbo paper I also have a 6x6 pad of these papers .. or should I say had ..... there is not much of it left now and I can't wait for the new collections to hit our shores!! So one of the small squares is actually Garbo again but in a smaller print which is what I love about the mini pads!! Same patterns but different because of the size of the print!!

Oh .... and of course my Dymo sneaked in there again LOL!!

I didn't have the chipboard or stickers to match the papers so I made the embellies myself by cutting out the shapes from the papers themselves and layering them  ... 
... I also used some rub ons! 
The alphas are AC Thickers Emerald & one of my all time favs Black Daiquiri.
Oh and the little birdie is a My Little Bit of Whimsy ... 

Sorry the colours are not the best on these as I didn't have the best light to take the photos! So the close ups look a different colour to the full page!!!! my bad!!

Thanks for stopping by ... really appreciate that you guys keep coming back!!
Until next time  ...
Wendy x

Monday, February 14, 2011

Love Trio ....

It is the time for L O V E .... so to celebrate I made a trio of LOVE cards using some gorgeous goodies from My2Angels! 
All these cards use the same patterned papers, The Girls Paperie, Toil & Trouble – Writing on the Wall and Echo Park, Little Boy – Strawberry & Sky.  I have used Core-dinations Nightfall & Bazzill Kraft cardstocks. The white card I have used is some I managed to find in my stash! I am ALWAYS running out of Black & White cardstock!!

J'taime
For J’taime I have have embossed the Echo Park paper with the Script Cuttlebug Embossing folder  and I have threaded some My2Angels White Hearts Satin Ribbon through a punched border between the 2 papers. The My2Angels Silver Self Adhesive Rhinestone Heart was stuck onto the Echo Park paper and then mounted onto black cardstock.
‘Love’ is Scrapware Chipboard Antique Lowercase Alphas, very lightly inked,  the ‘o’ though is a My2Angels Circle Pendant, covered with the embossed Echo Park paper and then a My2Angels Eiffel Tower charm (how gorgeous is this"!). To carry on with the French theme I have used my Dymo to punch out a j’taime’ label!!

Love Stitch
For this one I have used Kraft cardstock with the same papers. I’ve used a couple of die cut labels and stuck them on to look like they wrap around the whole card. I’ve used some red embroidery thread to ‘sew’ the labels together.
 The ‘Love’ title is a My2Angels Love Pin but I have chopped off the bottom of the pin (so sorry Tracy!!) and mounted it onto 2 die cut circles of black cardstock.  I’ve fake stitched around the inside label.


Lock & Key
For the final one I’ve used white cardstock with the same papers, I loved playing with all different coloured cardstocks with the same papers ... you can get such different results.
 I punched the edges of both papers and again used some My2Angels Black with White Hearts, satin ribbon. I then onto the ribbon a My2Angels Large Silver Heart Locket and Love Key charm.
The 2 tiny hearts are Maya Road Trinket Pins and for 'love' I've used my Dymo again!! just love it!!! I finished by applying some Inkssentials White Enamel to the holes made by the punching on the red paper.


... and to finish a couple of photos from my DS's football training session on the beach last week! It had been 36 degrees here in the day and the beach and water was just fabulous! But then I, ONLY went for a walk and a swim .... he did a 6km run up the beach and multiple sprints on the soft sand !!!! so it was a tad harder work for him than me LOL!!!

BTW this one is NOT my child thank goodness!!!

If anyone else is having problems with photos loading on their posts, can you tell me how to fix it! I've never had a problem previously but the last 2 posts I've had to play with the size of the picture so it loads when you open the page ... & please let me know if the photos are not loading when you open this post! Thanks :):)

TFL and for all your lovely comments .... makes my day that you take the time to leave some love .... thank you SO much!! 
.... still loving making these cards ....
Till next time .....
Wendy x

Tuesday, February 8, 2011

Only the essentials ...

.... that is all I have to share at the moment, some cards I've made for upcoming birthdays etc! I'm currently busy looking for my scrapping alter ego ... it seems to have run away and been taken over by my card making one LOL!!! I've found the card making has really helped me to relax over the last couple of weeks so I'm just going with the flow at the moment.
***Sorry some of the photos are smaller than others, you can click on them to get a larger image, some were not loading so I have shrunk those ones down in size, hopefully this will fix it!!***

First a Birthday card for a 10 year old ....
 ... the inside

A baby congratulations card for a new Grandad!!!
How cute are these little my2angels baby shoes ...  

A couple of spare birthday cards just because I liked the way the 1st one in this post turned out using these Bo Bunny party papers ... 
... the inside
... a close up of the 3D mounted circles on the front 

.. a close up of the Glossy Accent details I added ... 

... 2 more birthday cards ... one for my lovely Auntie


... and one for my SIL

and lastly a card and tag I made for my mum - love you always, mum xx
... love this gorgeous my2angels cross 
... and 'heart' Cosmo Crickets Circa 1934 papers!

Phew there are a few photos here ... hope you made it to the end!?!?! 
Enjoy your week, whatever you are doing ...
Thanks for dropping by ... see you soon
Wendy x

Friday, January 21, 2011

Here are some cards to share ....

Hi, just a few birthday cards to share (I seem to be loving making cards at the minute ... not sure how long that will last though!! so better keep going whilst I'm in the mood!!) 

One I made to go with a Tutorial for making a Rosette that I did for My2Angels, which you can check out HERE and all the products I used are posted HERE.
I have used one of the gorgeous new my2angels Timepieces ... 

A couple more .... one for a Birthday tomorrow 
(pretty sure he won't be checking out my blog tonight!!)  ....

... and another just because 

Love my MS butterfly punch ...

... and finally a very cute little RSVP card I did using one of the dies I got in a set from Corrina for Christmas ... love this little window die! (I made the little envelope too ... cute eh?)

OK thats it for now .... TFL be back again soon ...
Wendy x

Saturday, January 15, 2011

For You!

Firstly to everyone in the state of Queensland who has been affected by the horrendous floods recently ... my heart goes out to you! I can not imagine what you must all be going through, the media reports have been absolutely unbelievable with so many families and businesses losing so much! I was pleased that 'the boss', Tracy at my2angels, was out of harms way and that my blogging buddy Mel, was also OK, although she was a little wet!!!! Big hugs Mel!! I am not sure of the location of a lot of my other blogging friends but I hope that you are ALL safe.

At my2angels this month, we are showcasing embellishments so I have put together some cards where I have made my own embellishments. The first card ‘For You’ is using some Core-dinations Raspberry (or similar colour) cardstock and some Prima Flights of Fancy ‘Ladybug’ paper.
First I trimmed the card with a border punch and then attached pieces of inked Prima paper, behind the punching and also on the front of the card. Before attaching the larger piece of paper I tied some ribbon around the card then tied it towards the top of the card. Next I cut out a label shape from the reverse of the paper, inked the edges and stuck it so that it was under where the ribbon was tied. 


Next take your my2angels Circle Pendant and cut out a circle of the paper and apply your rub-on sentiment. Then stick this to the pendant and cover with Dimensional Magic. When dry position your flowers (I used two for depth) so that the pendant, when attached fits in the centre of the flower. Stick it down and tie a bow in your ribbon. 
The effect of the glossy centre to the flower, really finishes it off.  
  
Next ..... some flowers!!

Again using some Coredinations Raspberry, Snowflake & Kiwi (or similar) cardstocks. I have trimmed my Kiwi cardstock to fit inside the Raspberry card and then used a MS edge punch to form a lattice pattern. I have then attached this to the Snowflake card.  I used ribbon for my sentiment but you could easily change this for alpha stickers or a rub on. I have then used a pack of My2Angels Stemmed Star Flowers in Pink and made a bouquet out of them using again the Prima Flights of Fancy paper to 'wrap' them in.  I have added Pink Pearls to the centres of all the flowers and lightly Kindy Glitzed the petals.

   I inked the Tattered Angels Rockin Renaissance Crepe Ribbon with the VersaMagic Jumbo Java Ink, folded it and tucked it behind my bouquet. I finished off by adding a couple of MS punched butterflies which I also gave a dose of Kindy Glitz (Crystalina) I used Dimensional Magic to stick the bouquet and the butterflies to the card. You could use any butterflies of your choice ...  to see some chipboard ones, check out the Scrapware Section in the shop.


Finally .... I made a Rosette!!


I love making cardstock cards, for a long time I didn’t use a lot of patterned papers at all, so going back to using just a little paper was pretty easy for me!


First take the Core-dinations Sutter Butter cardstock and cut out a square card, cut out a slightly smaller piece of the French Roast cardstock for the mat on the front of the card. I have then ‘stitched’ a border around the edge (it looked a little bare!) its actually white rub ons which I have then rubbed with VersaMagic Jumbo Java ink, the same effect could be done with a gel pen and a steady hand or you could stitch it for real! I have then used some Graphic 45 paper and cut out a couple of ‘borders’ one with an edge punch using the reverse of the paper and one a straight strip which I have mounted onto some of the French Roast. Ink all the edges with the Jumbo Java ink. 
The rosette was made by cutting out a 4cm strip of the paper, scoring it at 1cm intervals and then concertina folding it. I used 2 circles to hold it at the back and front and then added a rub on sentiment to the front circle, again rubbing it with the brown ink to tone down the white. I also inked the edges and the ridges of my rosette. 


Stick the rosette on the card with some dimensional magic or other strong glue and you’re finished. 


One point thought I think this is more ‘a give to someone card’  than ‘a post to someone card’ LOL .... as it is rather lumpy!!!


TFL (as always) ..... be back soon!


Wendy x


Thursday, January 6, 2011

Calendar pages ...

I was sorting through some 'stuff' last night and came across my calendar for 2009 and thought it would be such a shame to throw all the 'mini pages' away! So I set about pulling it all apart, adding a couple of things and re-attaching the pages to 12x12 cardstocks so I could put them in my albums!
Here are the 3 pages I got done last night .....
April 2009 .... Sam's 10th BD

March 2009 ..... pre-season football training at the beach
February 2009 .... Back to School 
Thanks for looking .... I also got a couple of cards made too, but can't show those yet! soon though!!
Don't forget to check the SALE out over at MY2ANGELS ....
Till next time ...
Wendy x

Monday, January 3, 2011

A new year and a LO from last year !!!

2011 already ..... Happy New Year everyone!!! I hope 2011 is kind to you all!!!

Hard to think 2010 has gone even though it was a year of change for me ..... I went back to work full time and my oldest son became a teenager (with all that goes with that title LOL!!) and I had the best year working with my bestie, Corrina on the my2angels DT! Tracy is awesome to work with and sooo easy to get on with!
Really looking forward to another fun filled term on her Design Team!!

This year we welcome Geli Duncan, Jess MacKenzie, Lindy Gillespie & Lisa Webb to the team, Welcome Girls!!! Looking forward to working with you!! 
A sad farewell though to the gorgeous Taryn, its been great working with you Taryn, good luck in your new ventures!!

Talking of my2angels .... you had better pop over HERE and check out the SALE Tracy is having ... Until the 20th January 2011 there is up to 50% off ALL Patterned Papers, Christmas Ribbons and Christmas Felt.
And to make it even better the free gift this month is .... 10% off your total order (in addition to the above discount!!) Just remember to enter 'January' in the Promotional Box at the checkout to receive the extra 10% 
So go check it out ...... 
Oh and whilst you are there check out Tracy's new Decorative Pins .... they are gorgeous!!  Here is one of my favs!!

Just a quick LO to share today ...... one I did last year (LOL!) using one of Tracy's Christmas embellishment tutorials last month .... I really really love this Bakers Twine!!!
I have used some Little Yellow Bicycle Christmas Delight Papers, ’ Tis the Season Stripe-Starry Night’ for the background and ‘Peppermint Mix-Frosty Mint Fa La La’ for the green panel.  I have wrapped some Bakers Twine ‘Maraschino Red & White’ around the green panel and tied on a My2Angels Christmas tree charm. 
Next I took a Scrapware Mini Fence (one of my absolute fav embellies!) and painted it using 'Ruby Red' Liquid Pearls, then I inked the top of the fence with white ink and added some Ranger White Embossing Puffs for some snow! I also inked and Crackle Accented a Scrapware Mini Holly and used the ‘Ruby Red’ Liquid Pearls for the berries.
My title and the snow flake are die cuts and I used Kindy Glitz on the letters and Diamond Dust on the snowflake! The ’10 for the date are Sassafras ‘Apple Jack’ Glitter Stickers.  
For the red candy lollies I have used an idea Tracy put on the blog a couple of weeks ago, only I didn’t use the lollipop charms, I just used the Bakers Twine and some punched circles. The stems are some My2Angels Silver Acrylic Chain with Rhinestones .  
So easy to make and yet so effective.

Thanks for looking! 
Catch you again soon
Wendy x

LinkWithin

Related Posts with Thumbnails